- Mobile:+8613538150631
- Email:colorfulparkgame@126.com

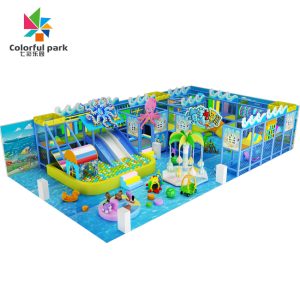
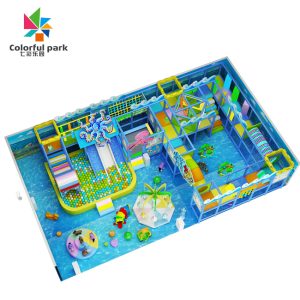
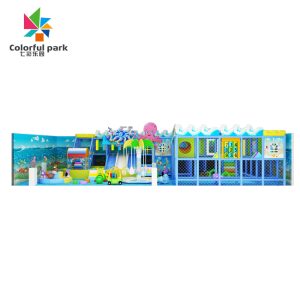
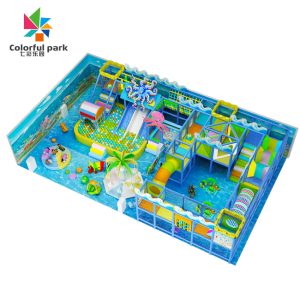
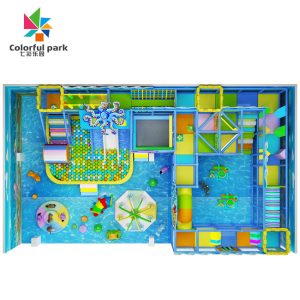
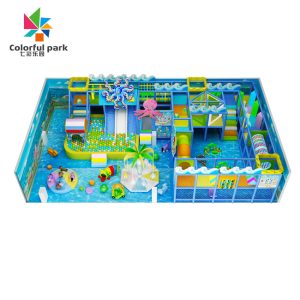
1marine style soft playground
what is 1marine style soft playground?
Naughty castle, also known as children’s castle, refers to a new generation of children’s activity center that integrates entertainment, sports, intelligence, fitness and other functions through a scientific three-dimensional combination.
frame installation for indoor soft playground kiddie game machine?
Put the fastener at a suitable position on the connecting pipe, and tighten the wire with a tool
Personally according to the drawing, a pillar at the corner is first erected, put it in the right position, and put it into the chain according to the drawing.
Fittings, put the lower fixed foot plate on
According to the requirements marked in the drawing, pick up another column, put the connecting pipe in, and require the connecting pipe to touch the column pipe to tighten the swing wire with a tool.
For safety, fix the upper connector a little bit. Then put the connecting pipe in, and then tighten the fixed swing wire.
According to the drawing, put different link pieces on different columns. You can also put the foot plate on first and tighten all the connecting fasteners.
Stand up the column, connect it with the connecting pipe, and tighten the screws. Push it lightly until the whole frame is installed.
When connecting, it is required to go from the first floor to the second floor, then to the third floor, and finally to the top, the procedure is the same.
project installation
Insert the product with the hole into the standard connecting pipe, use the bottom as the standard, and insert it into the connecting piece. After it is in place, tighten the fixing screw to complete the whole process.
Division products are fixed in the same manner as the
Lift the required product to the position marked on the drawing, insert it into the reserved connector, and tighten the fixing screws
Raise the support tube to prevent product deformation to a reasonable position, and then tighten the fixing screws
Use a hand drill to drill the product according to the screw model standard drill bit, put a special screw out of the hole, add a gasket in the plastic phase cover, put the screw on, and tighten it with a tool
Lift the assembled product to the position marked on the drawing
Different products have different fixing screws. Use a pistol drill to drill a hole in the positioned product, insert a special media wire from the inner wall, and bring a cover. The gasket tightens the wire with a tool.
Products that do not need to be assembled can be directly lifted to the position marked on the national paper, and the distance around them should be determined with a ruler. The distance must be the same. Use a hand electric drill to drill holes from the inner wall of the product to the connecting pipe at the bottom
Insert the special flat-head screw, and fix the product on the connecting rod with gaskets and handkerchiefs at the bottom. The installation method of large products is the same.
The method of the chain bridge is to cut the iron chain, first put a special screw on one end, and fix it. Fix the other end in the same way
Put the customized product from both sides, put it on the pulled iron chain, and tighten the product with spacers and nuts at the bottom, and the middle size must be the same size.
Except for the platform, the netting starts after all products are fixed.
Before pulling the net, unwrap the whole roll of wire and pull it to the same length. cut down the middle with a knife for netting
The net must be pulled from the side of the block, from the outside of the column to the other side.
Start fixing from the top corner. After the top corner is fixed, use the rope to wind the net to the other corner. It is best to go beyond the other corner, and then go back to the edge of the net against the column, and go directly to the desired pull. bottom of the net.
The bottom must be fixed tightly with a knot. It is very difficult to pull the bottom side net. After the bottom corner is tightened, the protective net is required to be tightened and fixed every two meters below the fixed net on the top, so that the net cannot be pulled.
It is not beautiful when it is down or pulled well.
The bottom net requires that each knot must be tied with a knot between every three grids. After pulling all the netting, start packing the protective case
Use a knife to cut open the protective sleeve according to the middle seam.
Some products are opened directly, so be careful not to cut or scratch your hands.
Place the casing in the packaged position and use a blade to cut off the part to be crossed out. The inner wall of the crossed-out part should be thinned so that it looks more beautiful. When scratching, make sure that the connecting parts and pipes are not exposed after wrapping. Different parts cut off the size is not the same.
Tighten the flexible hose with a special cable tie. The iron pipe should not be exposed outside, which will affect the safety and appearance. There must be cable ties on the top and bottom of each fastener, and the cable ties should not be too tight.
The packaging method of the connecting rod is also the same, but the way of opening is different in different places. Where there is a net, the net head must be wrapped inside, and it cannot be exposed, which will affect safety and appearance.
After tying, the excess ties must be cut flat with a knife to prevent children from being tied. After all safety is completed, the plastic phase cover must be covered with a special cover to ensure safety